Table of Contents
Replace Atmega2560 at Trigorilla board
If the Atmega2560 is broken, gives for example wrong temperature readings 1), this is most likely caused by electrostatic discharge, destroying one or more input pins.
With the right equipment, removing the Atmega2560 and soldeering a new one should be pretty straightforward. Once done, you need to make sure that the arduino bootloader is in place.
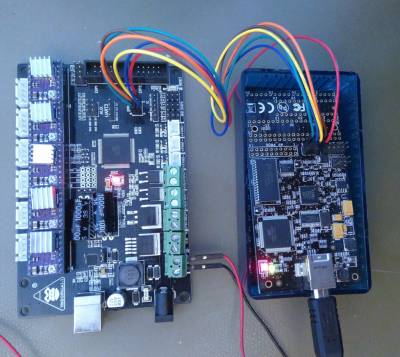
For this you need a programmer like the AVR Dragon. The connection typically would look like:
This is the wiring connection between an AVR Dragon and a Trigorilla ISP connector:
| AVR Dragon ISP (pin) | Trigorilla ISP connector (pin) |
|---|---|
| 1: MISO | 1: D50 (Mega2560 pin 22) |
| 2: VTG | 2: +5v |
| 3: SCK | 3: D52 (Mega2560 pin 20) |
| 4: MOSI | 4: D51 (Mega2560 pin 21) |
| 5: RESET | 5 RESET (Mega2560 pin 30) |
| 6: GND | 6: GND |
(Pin marking is given on the silk-screen)
For flashing the bootloader, download and install avrdude:
Download avrdude
Install avrdude
# Dependencies
sudo apt-get update
sudo apt-get install build-essential bison flex automake libelf-dev libusb-1.0-0-dev libusb-dev libftdi-dev libftdi1

mkdir -p $HOME/SOMEWHERE/apps/avrdude
cd !$
wget http://download.savannah.gnu.org/releases/avrdude/avrdude-6.4.tar.gz
tar xzf avrdude-6.4.tar.gz
# See here https://www.gnu.org/savannah-checkouts/gnu/bash/manual/bash.html#Word-Designators
# for an explanation about word designaters in bash
cd !$:r:r
./configure
make
sudo make install
udev rules
In /etc/udev/rules.d add (obviously as root user) the following file: 45-atmel.rules
# Atmel Corp. Dragon
ATTR{idVendor}=="03eb", ATTR{idProduct}=="2107", MODE="660", GROUP="dialout"
Then reload udev rules with:
sudo udevadm control --reload-rules && udevadm trigger
Flashing with avrdude
Download bootloader
A bootloader can be found in the arduino directory from where you downloaded the arduino IDE itself. The location for Arduino-1.8.5 is:
Original bootloader:
../arduino-1.8.5/hardware/arduino/avr/bootloaders/stk500v2/Mega2560-prod-firmware-2011-06-29.hex
or the newer one that fixes the WDT and the !!! problems2):
arduino-1.8.5/hardware/arduino/avr/bootloaders/stk500v2/stk500boot_v2_mega2560.hex
0. Get Chip information
avrdude -p m2560 -P usb -c dragon_isp -v
1. Unlock fuses, erase, verify
The original command would be:
avrdude -p m2560 -c dragon_isp -P usb -Ulock:w:0x3F:m -Uefuse:w:0xFD:m -Uhfuse:w:0xD8:m -Ulfuse:w:0xFF:m -e -v
But this command will cause avrdude to show an error at the verification step3). To prevent this error, it is recommended to change this command into:
avrdude -p m2560 -c dragon_isp -P usb -Ulock:w:0xFF:m -Uefuse:w:0xFD:m -Uhfuse:w:0xD8:m -Ulfuse:w:0xFF:m -e -v
The reason is that only the lowest 3 bits from the lockbits are used. The other bits don't return any sensible value and causes avrdude to indicate an error. Ideally you would need to use a logical AND to filter for the lowest 3 bits.
2. Write the bootloader, set the lock fuse, verify
avrdude -p m2560 -c dragon_isp -P usb -Uflash:w:stk500boot_v2_mega2560.hex:i -Ulock:w:0x0f:m -v
Similarly as in step 1, to prevent an error with the fuse setting at the verification step, change this command in:
avrdude -p m2560 -c dragon_isp -P usb -Uflash:w:stk500boot_v2_mega2560.hex:i -Ulock:w:0xcf:m -v
Problems
verification error, first mismatch at byte 0x0000
If you get an error like the following with avrdude:
...
Reading | ################################################## | 100% 0.05s

avrdude: verifying ...
avrdude: verification error, first mismatch at byte 0x0000
         0xcf != 0x0f
avrdude: verification error; content mismatch
...
You may have to change the fuse setting verification step4). See above for the change.
